


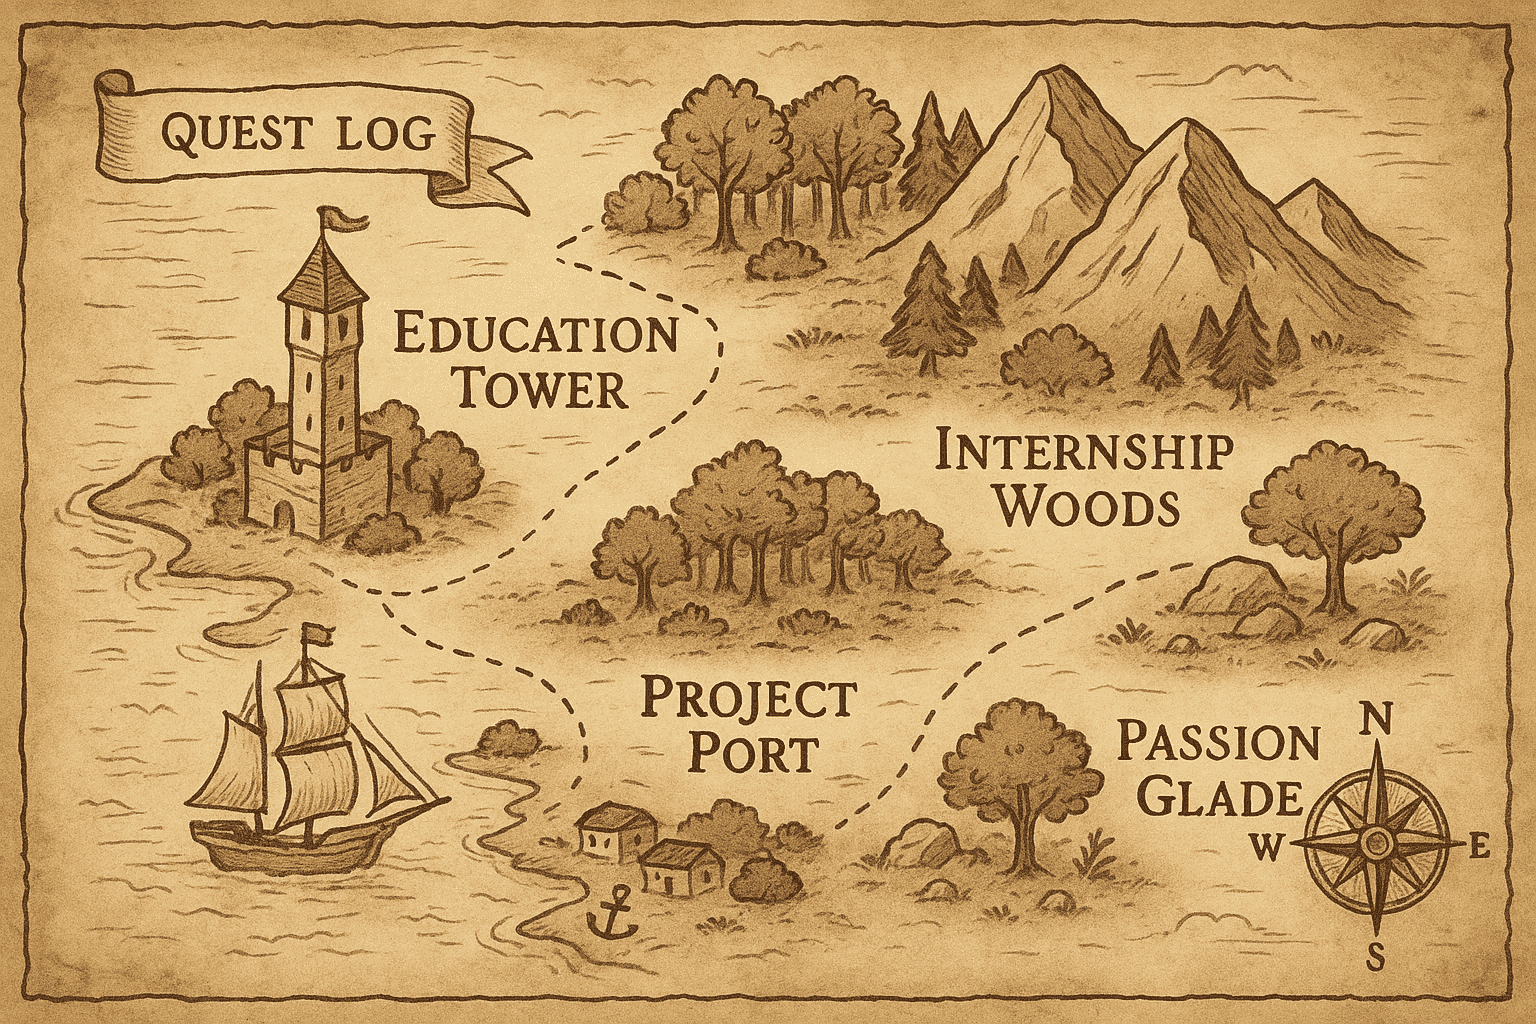
Creating a Resume That Feels Like a Ghibli Adventure Map
Imagine unrolling a weathered parchment and revealing a whimsical map of your career journey. Each landmark on this Ghibli-style adventure map represents a part of your resume, guiding employers through your story as if they were embarking on a fantastical quest. Blending playful fantasy storytelling with practical resume advice, this guide will help you craft a resume that’s as enchanting as it is effective.
Why a Ghibli adventure map? Studio Ghibli films are beloved for their rich, immersive worlds and sense of wonder. We’re borrowing that spirit to transform the often-dry resume into a captivating landscape. But make no mistake – beneath the imaginative metaphor lies solid, clear resume-writing guidance. Recruiters often scan a resume in mere seconds, so our goal is to grab attention fast (like spotting a shining castle in a valley) while clearly highlighting your qualifications. Ready to turn your resume into an enchanting adventure map? Let’s journey through the key regions of your resume land:
Quest Log: Setting Out on Your Career Journey (Summary Statement)
At the very start of your map – usually at the very top of your resume – lies the Quest Log. This is your career summary or objective, a brief proclamation of your mission. In a Ghibli adventure, the Quest Log might be a scribbled note from a wise mentor; in your resume, it’s a 2–3 sentence introduction that tells who you are, what you bring, and what you seek.
What makes a great Quest Log? It should be concise, tailored, and compelling. Hiring managers may only give your resume a quick glance, so your Quest Log needs to spark interest in seconds. Write it as if it were the legend on your map – a guiding narrative for everything that follows:
- Keep it short and specific: Aim for one to three sentences summarizing your experience, key skills, and career goal. Think of it as the “once upon a time” of your story, enticing the reader to read on. (For example: “Data analyst and storyteller with 3+ years experience turning numbers into actionable insights, now seeking to embark on a new quest in healthcare analytics.”)
- Highlight your strengths and goals: Clearly state your role or expertise and what role you’re pursuing. Your Quest Log is like a prophecy – it should foreshadow your value to the employer. Make sure it focuses on what you can do for them, not just what you want.
- Tailor it to the job: Just as a quest is specific to its world, your summary should align with the position. Mention the most relevant skills or achievements that match the job description. If you’re changing careers or just starting out, you might frame this section as an Objective (emphasizing your passion and goals) rather than a Summary of past work. Either way, customize the wording for each role so the hiring manager instantly sees you’re a fit for their adventure party!
Education Tower: Foundations of Knowledge
Looming on the horizon of your map is the Education Tower, representing the academic foundation of your journey. This tower is built with every block of knowledge you acquired – from degrees and certifications to online courses. In practical terms, this is your Education section, where you list your academic background. Climbing the Education Tower: Much like a sturdy castle keep, your education credentials prove you have the fundamental knowledge for the job. Here’s how to present them:
- List your highest education first: Typically, resumes list education in reverse chronological order (most recent or highest degree first). Include the name of the institution, location (optional), degree earned, field of study (major/minor), and graduation date. For example: “B.Sc. in Computer Science, University of Lagos – Graduated 2024.”
- Include relevant details: You can add honors, thesis title, or relevant coursework if you’re a student or recent grad and it strengthens your case. However, keep it concise – the tower should be tall, not overly ornate.
- Consider additional training: Have you completed online courses, bootcamps, or certifications (Coursera, LinkedIn Learning, etc.)? These can be listed as well (perhaps as smaller turrets on your tower) to show continuous learning. Just ensure they are relevant and fairly substantial.
- Placement depends on your journey stage: If you’re a new graduate or student, the Education Tower might be one of the first landmarks (sections) on your map – it’s a key qualification for entry-level roles. If you’re a seasoned professional, the tower might sit further down the map, letting your Experience shine first. Employers weigh education differently depending on how long you’ve been out of school. (In other words, a hiring manager will scrutinize a college senior’s education more closely than someone with 10 years of experience.)
- Design idea – tower icon: To stay on-theme, you could adorn this section with a small tower or castle icon next to the heading “Education.” This adds visual flair and reinforces the metaphor. Just keep it subtle and professional.
Storytime Tip: Describe your education in a way that fits the narrative. For instance, “Fortified my knowledge at Oxford University (2018–2022), earning a B.A. in Literature – the cornerstone of my communication skills.” It’s okay to be a little playful in a creative resume, but ensure the key facts (degree, school, date) are crystal clear.
Internship Woods: Early Work Experience Trails
Beyond the tower, our map winds into the Internship Woods – a forest symbolizing your early work experiences. These woods might include internships, part-time jobs, volunteer work, or any hands-on experience especially relevant for those early in their career. For more experienced folks, this section would simply be your Work Experience (you can imagine it expanding into a vast forest encompassing full-time roles). In these woods, each tree is a job position and each ring on the tree trunk tells the tale of skills grown and lessons learned. To navigate the Internship Woods effectively, here’s what to do:
- List roles in reverse chronological order: Start with your current or most recent job/internship and work backward. Include job title, company name, location, and dates of employment for each role – these are like the coordinates of each “tree” in the forest.
- Use bullet points to describe your adventures: Under each role, bullet points are your friend. Each bullet is like a snapshot of a quest you completed in that job. Lead with strong action verbs to describe your responsibilities and achievements (e.g., “researched,” “created,” “managed”). This paints a dynamic picture of your actions rather than a passive description. For example, instead of saying “Responsible for social media,” say “Managed a social media campaign that increased engagement by 40%.”
- Highlight your achievements and impact: Don’t just tell what you did – show results (a classic storytelling adage: “show, don’t tell”). Quantify outcomes wherever possible, as numbers stand out like landmarks in a dense forest. For instance, “Improved data processing speed by 25%,” or “Mentored 4 junior interns”. Concrete achievements give the hiring manager a clear sense of your impact.
- Connect to the quest ahead: Emphasize experiences that showcase skills relevant to the job you want next. Just as a forest might contain medicinal herbs needed for a later quest, point out transferable skills (teamwork, problem-solving, etc.) you gained, especially if they align with the target role. If you had leadership roles or tackled challenges similar to what the new job requires, make sure those stand out.
- Don’t underestimate any experience: In a Ghibli adventure, even a seemingly mundane task can become magical. Likewise, any job can yield valuable skills. If you think, “Oh, I just worked at a cafe, nothing special,” reconsider – did it teach you customer service, time management, reliability? Describe those responsibilities in professional terms (e.g., “Managed daily orders for 50+ customers, maintaining accuracy and friendly service”). Sometimes it’s all about perspective: the Harvard Career Services notes that even sitting at a reception desk can equate to managing front-office operations. So shine a positive light on all relevant experiences.
- Keep it concise and consistent: While you might have many “stories” to tell from each job, choose the most relevant and impressive ones. Aim for 2–4 bullets per position focusing on key achievements. Ensure formatting is consistent (bullet style, tense usage, etc.) across all jobs to maintain a coherent forest layout.
Design idea – tree or leaf motifs: To emphasize the woods theme, you might use a small tree icon next to each job heading or a vine-like border for this section. Be careful not to overload the design, though – clarity comes first. Every tree in your forest should be easy to read at a glance (clear job titles, company names, dates).
Skill Mountains: Peaks of Your Abilities
Every hero has special skills that carry them through their journey. On our adventure map resume, your skills stand tall like a range of mountains, proudly displaying the peaks of your technical know-how and soft skill strengths. This section, often simply titled “Skills,” is where you list the abilities that make you a formidable candidate (the tools in your adventurer’s pack, so to speak).
Charting the Skill Mountains: Presenting your skills effectively helps employers quickly see if you have the expertise they need. Here’s how to map them out:
- Decide on format – list or categories: If you have a variety of skills, consider grouping them into categories. For example, Technical Skills: Python, Excel, CAD; Soft Skills: Project management, Team leadership, Communication. Grouping can form distinct “mountain ranges” for each type. This makes it easy for a recruiter to locate the specific skills they’re scanning for.
- Identify key skills for the job: Ask yourself what skills the employer values most. A quick way is to review the job posting and see which skills or keywords appear frequently. Then make sure those are prominent in your list (if you have them). It’s like making sure the tallest mountains on your map are the ones the king (employer) is seeking. In fact, career experts suggest separating your hard skills vs. soft skills and then highlighting the ones most in demand for your target role.
- Lead with your strongest, most relevant skills: Put your best foot forward (or highest peak first). If, for example, you’re an illustrator proficient in Adobe Suite and also speak basic French, prioritize the Adobe skills if they matter more to the job, and perhaps leave out French unless it’s a plus. Quality over quantity – it’s better to list a solid range of relevant skills than to pad the list. Pro tip: You can indicate your proficiency level or experience for important technical skills. For instance, “Python – 5 years experience” or “Spanish – fluent.” This gives context, much like marking a mountain’s height. One guide advises asking yourself “How well do I know this skill? How have I used it?” and providing specifics. If you can point to a credential or project as proof (e.g., “Google Analytics Certified” or “Portfolio available”), even better.
- Hard skills and soft skills: Hard skills are your technical abilities and knowledge (the tangible skills like software, languages, tools, accounting, etc.), whereas soft skills are interpersonal or work-style skills (communication, leadership, problem-solving, etc.). It’s good to include both, but be mindful: most recruiters prefer to see hard skills explicitly, and soft skills can often be inferred from your experience. For example, instead of simply listing “teamwork,” you might reference collaboration in a project bullet point. Still, if soft skills are crucial for the role (e.g., teaching requires public speaking), you can list them. Consider giving concrete context: “Project Management – led teams of 5+ on multiple software projects” merges a soft skill with evidence.
- Be honest and specific: Only list skills you truly have. Exaggerating proficiency is like claiming to have climbed Everest when you’ve only hiked a hill – it won’t end well if tested. Also use standard terms that hiring systems and humans will understand (stick to generally known skill names or frameworks).
- Design idea – mountain icons or graph: For a creative resume, you might visually represent skill levels as little mountains or bars (like an infographic). For example, some resumes use icons or bar charts (⚫⚫⚫⚪⚪ to show proficiency). If you do this, also include text so an ATS (Applicant Tracking System) or anyone printing in black-and-white still gets the info. A simple approach is listing skills in text, separated by commas or pipes, perhaps preceded by a small mountain 🗻 emoji or icon for decoration (ensuring it doesn’t confuse any software reading the resume).
Remember, your Skill Mountains should signal how you can quickly contribute to an employer’s needs. Choose a clean layout that is easy to skim – perhaps a two-column list if you have many items. Example:
- Technical: HTML | CSS | JavaScript | Python (8 yrs) | Excel
- Soft: Public Speaking | Team Leadership | Problem-Solving | Bilingual (English/Spanish)
Such a layout is both thematic and straightforward. By showcasing the right peaks, you’ll inspire confidence that you have the tools to complete the quest at hand.
Project Port: Showcasing Your Creations and Adventures
Picture a busy harbor on your map, where ships come and go carrying the fruits of your labor – this is the Project Port. It’s the section to highlight significant projects you’ve worked on, whether they were part of your job, school, or personal passion pursuits. Projects are especially valuable if you’re a student, a freelancer, or someone in tech or creative fields, or if you have notable side gigs. They act like side-quests in your adventure that show extra skills and initiative beyond your primary experience.
Docking at Project Port – what to include: Not every resume includes a separate project section, but if yours does, make it count:
- Select relevant projects: Think of 2–4 projects that best demonstrate skills relevant to your desired job. It could be an academic capstone, an open-source contribution, a portfolio piece, a hackathon, a design portfolio, a research project, or even a major success from a previous job that you want to spotlight separately. These are the ships in your port – choose the most impressive vessels that sailed the farthest.
- Provide context and your role: For each project, list a title or short name, and perhaps dates or duration. One effective approach is to treat it a bit like a mini-job entry. For example: “Weather Analysis App (Jan–Apr 2024): Developed a mobile app using React Native and OpenWeather API to provide real-time weather alerts to 5,000+ users.”* Make sure to note what the project was, what skills/technologies you used, and the outcome or impact. Include key details like the size or scope (team of 3? budget of $5k? 6-month timeline?) if relevant. These details help hiring managers understand the scale of your accomplishment.
- Emphasize skills and results: Projects are a great way to prove specific competencies. Did your project achieve something measurable (improved performance by X, won an award, received an accolade)? Mention it. If it’s a group project, clarify your contributions (“led the front-end development” or “managed the research phase”). This shows what skills you brought to the table, reinforcing the mountains we listed earlier.
- Keep descriptions concise: Just like work experience, use bullet points or a brief paragraph to describe what you did. Focus on action verbs and outcomes here too. For personal or academic projects, one bullet point may suffice if it’s tightly written. The key is brevity – you want this section to be a highlight reel, not a novel. Indeed.com recommends keeping project descriptions as short as possible to maintain attention.
- Link to proof (if appropriate): If the format of your resume allows (especially for digital copies or LinkedIn), you could link to a portfolio, GitHub repository, live demo, or publication. For instance, listing “Project X – a data visualization dashboard (see GitHub)” invites interested readers to view your work directly. Just ensure any link is professional and working.
- Placement and format: You can integrate projects into other sections if that makes sense – for example, under an experience entry (“Achievements: …”) or within your education (like listing a thesis or course project under the degree). But if you have multiple unrelated projects, a dedicated Projects section (or “Personal Projects” or “Key Projects”) helps organize them. Format them consistently so they’re all presented in a similar manner (same font, structure, etc.) for a polished look.
- Design idea – anchor or ship icon: To accentuate the port theme, a tiny anchor ⚓ or ship symbol by the section title “Projects” could be a charming touch. You might also use a subtle wave or divider line. Keep graphics simple so as not to overwhelm the text.
By including a Project Port, you show employers a deeper glimpse of your capabilities – it’s evidence of what you can create or contribute when given the chance. It’s particularly useful for filling gaps (for example, a recent grad with limited work experience can showcase a complex class project to demonstrate practical skills). Just remember to tie each project back to skills or accomplishments relevant to the jobs you’re applying for, so the hiring manager sees the value docking in their harbor if they bring you on board.
Passion Glade: Interests, Values, and Personal Qualities
Every adventure map has a peaceful meadow or secret garden – a place that represents the heart and soul of the adventurer. On your resume map, this is the Passion Glade, where you can share a bit of your personal interests, hobbies, or any extra qualities that make you you. This section is optional, but done right, it humanizes your resume and can spark meaningful conversations (or make you memorable). It’s especially helpful for early-career folks to show well-roundedness, or for anyone applying to a company culture that values personality. What to cultivate in the Passion Glade: This section might be labeled “Interests,” “Hobbies & Activities,” “Volunteer Work,” or similar – or creatively, you might actually title it “Passion Glade” on a themed resume (with an explanation). Here’s how to decide what to include:
- Relevant personal interests: List a few hobbies or passions that you genuinely engage in and are happy to talk about if asked. Bonus if they are relevant or showcase desirable traits (e.g., playing chess could imply strategic thinking, marathon running shows endurance and discipline, travel might imply adaptability and cultural awareness). You can simply list them as comma-separated items or bullets. Example: “Hiking and nature photography, Baking sourdough bread, Volunteer tutoring in math, Studio Ghibli film enthusiast.” This gives a snapshot of your personality beyond work.
- Volunteer work and extracurriculars: If you have significant community service, non-profit involvement, club membership, or side roles (like organizing a local tech meetup or being on a board of a student organization), include those too. These often showcase leadership, teamwork, or commitment. In fact, a Leadership & Activities section can be a fantastic differentiator, especially for students. Treat a major volunteer role similarly to a job (with the organization name, role, and achievements) if it’s substantive.
- Show contributions and leadership: Within listing activities or interests, highlight if you achieved something notable. For instance, instead of just “Member of XYZ Club,” you could say “President of University Anime Club (2022) – organized a 300-person convention.” This shows initiative. Focus on activities where you made significant contributions or held a leadership role.
- Keep it professional and positive: Passion Glade is not a diary – avoid overly personal or controversial topics. Steer clear of anything that might raise eyebrows or isn’t appropriate in a workplace context. Harvard’s career guide humorously advises not to mention being the “Top Drinker” of your college beer club, which is a good rule of thumb. In contrast, mentioning you volunteer at an animal shelter or run a book club is great – it sheds light on your values and character in a professional-friendly way.
- Selective depth: You don’t need to list every hobby under the sun. Choose a handful (2–5 items) that best represent you or are most unique. If space is tight, even one line of interests can suffice. If a particular interest is strongly related to the job or might grab attention (e.g., applying to a game design firm and you build indie games in your spare time), you might elaborate slightly on that one.
Why include interests at all? Employers are hiring a person, not just a list of skills. Sharing interests can make you more relatable and provide interview conversation material (“Oh, you do pottery? Me too!”). It can also subtly indicate cultural fit – for example, a company that values community might appreciate seeing volunteer work. Many career advisors suggest including specific interests you’d enjoy discussing if asked.
Design idea – a little sparkle: The Passion Glade could be decorated with a leaf, heart, or star icon to signify its personal nature. Maybe use a slightly more whimsical font for the section title (but still readable!). If you want to be visually creative, you could frame this section with a gentle border of vines or flowers, evoking a peaceful glade. Just ensure it doesn’t distract from readability.
Finally, remember that even though this part is more personal, keep it truthful and upbeat. This glade is meant to leave a positive, warm impression of you as someone with interests and passions – a well-rounded adventurer whose journey is about more than just work.
Bringing the Map to Life: Visual & Layout Suggestions
Now that the content of your resume is structured like a Ghibli adventure map, let’s discuss how to design it so the theme shines through while staying professional. A resume is ultimately a formal document, but creative touches can make it stand out (and reflect your personality). Here are some layout and design ideas to support the adventure map concept, for both creative resumes and more traditional formats:
- Choose a parchment-inspired template: If you’re going full Ghibli, consider using a parchment or lightly textured background (light beige or ivory tone) to give that aged map feel. However, be cautious: Fancy backgrounds can be problematic for online applications (ATS software might mis-read text). One compromise is using a simple border or header/footer with a parchment graphic, while keeping the main text area white for clarity.
- Consistent fantasy-themed icons: Sprinkle small, unobtrusive icons that match each section’s theme – a tower 🏰 for Education, trees 🌲 for Experience, mountain ⛰️ for Skills, ship ⚓ for Projects, leaf 🌿 or heart ❤️ for Passions, and maybe a scroll 📜 or compass 🧭 for the Summary/Quest Log. These icons act as visual anchors that organize information and guide the reader’s eyes, adding charm without needing lengthy explanations. Ensure the style of icons is consistent (all line drawings, or all filled, etc.) for a cohesive look. And don’t overdo it – icons should enhance, not clutter. Usually one icon per section heading is enough.
- Whimsical yet legible fonts: You might be tempted to use an elaborate fantasy font to mimic a fairy tale map. By all means, pick a fun display font for section headers or your name (something with an adventurous flair), but keep the body text in a clean, professional font. Readability is paramount – hiring managers shouldn’t need a magic spell to decipher your words. A good rule is to use at most two font families (e.g., an elegant serif for headings and a standard sans-serif for body). This maintains simplicity and avoids a jarring look. And maintain a font size of at least 10-12 points for body text for easy reading.
- Creative section dividers or borders: Subtle graphical dividers can reinforce the theme. For instance, a dotted line “path” between sections could indicate the journey from one section to the next. Or a small compass rose in a corner as a decorative element. If you have design skills, you could even sketch a faint map in the background with labeled areas corresponding to the sections (though be careful that it doesn’t reduce readability). Simpler is often better – even a horizontal line with a tiny icon in the center can suffice as a thematic divider.
- Color palette: Studio Ghibli aesthetics often use warm, harmonious colors – think earth tones, forest greens, sky blues. You can incorporate a couple of colors into your resume for headings or icons. For example, maybe a deep green for section titles and a soft brown for icon accents, echoing an old map and nature vibe. Ensure there’s good contrast (dark text on light background) so it’s easy to read. Pro tip: Use color sparingly – 2-3 colors at most – and make sure they complement each other. If printing, check that it still looks good in grayscale.
- Balance creativity with ATS-friendliness: If you plan to submit this resume through online portals, remember that about 95% of big companies use ATS software to scan resumes. Fancy formatting can sometimes confuse these systems. To appeal to both human and machine readers, consider these strategies:
- Ensure all text (even on a pretty background) is selectable/searchable (not part of an image). If you design in Word or a design tool, export to PDF to preserve the layout, but not as a scanned image.
- If you use icons or graphics, don’t substitute them for important text (for example, don’t use an image of a phone instead of writing “Phone:” – some ATS might ignore the image). It’s okay to have an icon alongside text for visual appeal.
- Keep a clean, text-only version of your resume handy. You might use the creative one for networking or as a PDF in an email, but for very traditional companies or older online systems, you might paste a plain version. Another idea: some job-seekers include a link to an online portfolio or LinkedIn where the creative version is displayed, while the submitted resume is simpler.
- Test the design: Before sending out your Ghibli-map resume, test how it looks on different devices (computer, phone, etc.) and if possible, run it through an ATS checker tool (many career sites offer this) to see if it remains parseable. Also, get feedback from both creative-minded friends and those in your industry – is it whimsical yet still professional? Does it reflect you well?
By incorporating these design elements, you’ll create a resume that not only tells your story in words but also feels like an adventure. It can strike a memorable impression – a recruiter might think, “Wow, this person turned their resume into a charming map – that’s different!” The key is making sure that after the initial “neat!” reaction, they can quickly find all the info they need (education, skills, etc.) without confusion. Form should never overshadow function. Think of it like the stunning visuals of a Ghibli film paired with a strong narrative – one enhances the other.
Adapting to Traditional Formats
What if you love this concept, but you’re applying to a very traditional workplace or you’re worried about ATS? You can dial down the imagery but keep the essence:
- Use the metaphor in your writing and organization, but not overly in appearance. For instance, keep standard section headings (“Summary,” “Education,” etc.), but you might incorporate a line in your summary like “embarking on the next chapter of my career journey.” This keeps the spirit alive subtly.
- Opt for a clean format with minimal icons – maybe just a small one in the header or none at all – and rely on excellent content. You can even mention your creative interests in the cover letter instead, if that’s safer.
- Another idea: have two versions of your resume – one “creative map” version for networking or companies that value creativity, and one “plain” version for online submissions or very conservative firms. The content will be the same; only the presentation differs. Since you’ve structured your information according to our adventure map outline, even the plain version will be well-organized and easy to follow.
In the end, whether you present it as a fantastical map or a classic resume, the goal is the same: to clearly demonstrate your qualifications and who you are as a candidate. The Ghibli adventure map theme is a means to showcase that information in a fun, engaging way. It reflects imagination, attention to detail, and a bit of boldness – qualities many employers appreciate.
Final Takeaway: Crafting “a resume that feels like a Ghibli adventure map” is about striking a balance between creativity and clarity. Start with solid content (your education, experience, skills, projects, etc. as we’ve mapped out), because no amount of decoration can substitute for substantive qualifications. Then, if you’re feeling inspired, embellish the journey – use storytelling elements, artistic layout, and heartfelt touches to turn your resume into an enchanting narrative of your professional life. Just like a Ghibli film, it should be memorable and meaningful. With this approach, you won’t just be another name on a resume – you’ll be the protagonist of an unforgettable story, inviting employers to join you on the next exciting leg of your career adventure. Good luck, and may your resume map guide you to your dream job!